Building a Cloud-Native GCP Knowledge Base Assistant with Google ADK and MCP
Welcome to the GCP Chatbot Workshop ! In this session, cloud-native AI assistant designed to help university students learn about Google Cloud Platform (GCP).
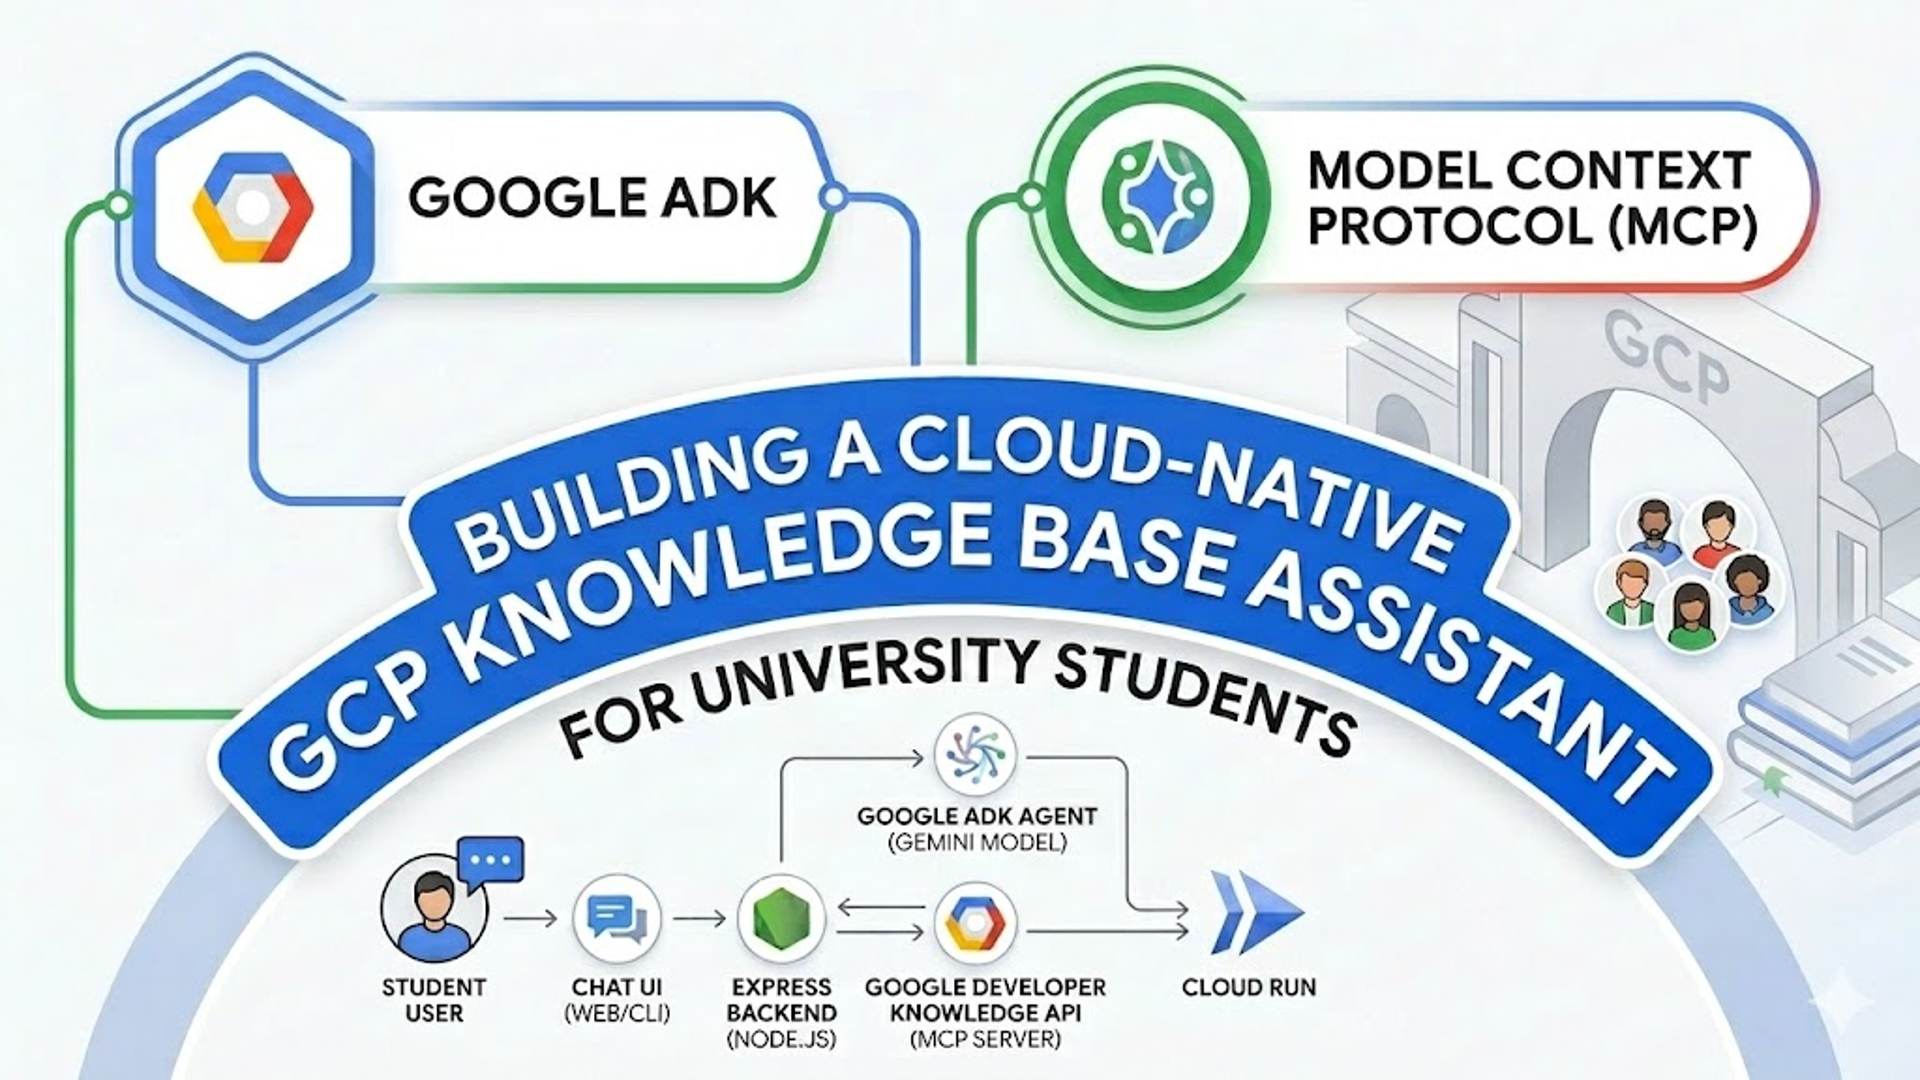
Building a Cloud-Native GCP Knowledge Base Assistant with Google ADK and MCP
Welcome to the GCP Knowledge base Chatbot Workshop! In this session, cloud-native AI assistant designed to help university students learn about Google Cloud Platform (GCP).
We will use the Google Agent Development Kit (ADK), integrate official Google documentation using the Model Context Protocol (MCP), and deploy the application to Google Cloud Run.

Resources:
- Full Article: GCP Doc Assistant on nja.dev
- Architecture Diagram: Edit in DrawIt
- GitHub Repository: assistantstudents.gemini.series
Setup: Get the Code
First, clone the workshop repository and install the necessary dependencies:
1
2
3
git clone https://github.com/nuno-joao-andrade-dev/assistantstudents.gemini.series.git
cd assistantstudents.gemini.series
npm install
Prerequisites: Setting up Google Cloud Credentials
To run this project, you need to authenticate your environment to access Google Cloud services. Both the Gemini AI model and the Documentation Knowledge Base will use your Application Default Credentials (ADC).
Option 1: Automated Setup (Recommended)
If you have the gcloud CLI installed, run the provided helper script from the root directory:
1
./setup-gcp.sh <your-google-cloud-project-id>
This script will automatically enable the required APIs, prompt you to log in for Vertex AI, and output the exact contents you need to paste into your base/.env file.
Option 2: Manual Setup
If you prefer to set this up manually:
1. Authenticate Vertex AI: Run the following in your terminal to set your Application Default Credentials (ADC). Note: If you are using Google Cloud Shell, you can skip the login command as you are already authenticated.
1
2
gcloud auth application-default login
gcloud config set project <your-project-id>
2. Enable Required APIs:
- Go to the Google Cloud Console.
- Navigate to APIs & Services > Library.
- Search for and enable:
- Vertex AI API
- Developer Knowledge API
3. Configure your .env file: Create a .env file in the base/ directory:
GOOGLE_GENAI_USE_VERTEXAI=true
GOOGLE_CLOUD_PROJECT=your-project-id
GOOGLE_CLOUD_LOCATION=global
PORT=3001
Getting Started: Exploring the ADK Boilerplate
Before we start writing code, let’s explore the initial boilerplate. The ADK comes with a powerful, built-in Interactive Developer UI that allows you to chat with your agent and inspect its internal execution traces.
You can launch this UI using the provided script or npm command from the root directory:
1
2
npm run web
# Or manually: cd base && npx adk web agents
This will start a local server and open your browser to http://localhost:8000.
- Select your agent from the dropdown.
- Try sending a prompt like “Hello, who are you?”.
- You can inspect the “Traces” tab to see exactly what the agent is doing behind the scenes.
Once you are comfortable with the interface, let’s start building the actual application!
Step 0: The Base Boilerplate
Goal: Understand your starting point and ensure the development environment is working.
You will do all your work inside the base/ directory. We have already provided a skeleton structure for you so you can focus entirely on the AI agent logic.
What is already provided in base/:
package.json& Webpack Configs: Configured to run React and Express concurrently.frontend/src/index.js: A simple “Hello World” React component.backend/index.js: A barebones Express server with a single/api/healthroute.agents/run-agent.js: An empty ADK agent configuration file.
Verify Step 0: Run the following command from the root directory:
1
npm run dev
This will open your browser to http://localhost:3000. You should see a basic welcome screen indicating that you are on Step 0. Stop the server (Ctrl+C or npm run stop) before moving on to Step 1.
Step 1: The Core ADK Agent (CLI)
Goal: Set up a basic CLI-based AI agent using the ADK. File to modify: base/agents/run-agent.js
Create the foundational agent logic. This script sets up the LlmAgent and uses the Runner to interact via the command line.
1
2
3
4
5
6
7
8
9
10
11
12
13
14
15
16
17
18
19
20
21
22
23
24
25
26
27
28
29
30
31
32
33
34
35
36
37
38
39
40
41
42
43
44
45
46
47
48
49
50
51
52
53
54
55
56
57
58
59
60
61
62
63
64
65
66
67
68
69
70
71
72
73
74
75
76
77
78
79
80
81
82
83
/**
 * Google ADK (Agent Development Kit) Core Components
 * Documentation: https://github.com/google/adk-docs
 */
const { LlmAgent, Runner, InMemorySessionService, stringifyContent } = require('@google/adk');
const dotenv = require('dotenv');
const readline = require('readline');

// Load environment variables (.env)
// Documentation: https://www.npmjs.com/package/dotenv
dotenv.config();

/**
 * 1. Define the LLM Agent
 * The LlmAgent is the brain of your assistant. It defines the persona, model, and core instructions.
 * Ref: https://github.com/google/adk-docs/blob/main/docs/concepts/agents.md
 */
const agent = new LlmAgent({
 name: 'Thucydides',
 description: 'Known as the father of scientific history. How can I help you?',
 model: 'gemini-3.1-flash-lite-preview', // The Gemini model to use
 provider: 'vertexai', // Uses Google Cloud Vertex AI
 instruction: 'Respond in a clear way' // System instructions (persona)
});

async function main() {
 /**
 * 2. Initialize the Runner
 * The Runner orchestrates the execution. It connects the Agent with a SessionService.
 * Ref: https://github.com/google/adk-docs/blob/main/docs/concepts/runner.md
 */
 const runner = new Runner({
 appName: 'GCPWorkshop',
 agent,
 // InMemorySessionService stores chat history in RAM (lost on restart)
 // Ref: https://github.com/google/adk-docs/blob/main/docs/concepts/sessions.md
 sessionService: new InMemorySessionService(),
 });

 // Standard Node.js Readline for CLI interaction
 // Documentation: https://nodejs.org/api/readline.html
 const rl = readline.createInterface({ input: process.stdin, output: process.stdout });

 console.log('--- ADK Agent CLI ---');
 console.log('Type your question and press Enter. Type "exit" to quit.\n');

 const ask = () => {
 rl.question('> ', async (input) => {
 if (input.toLowerCase() === 'exit') { rl.close(); return; }

 try {
 /**
 * 3. Run the Agent (Ephemeral Mode)
 * runEphemeral runs a single interaction without persisting it to a database.
 * It returns an AsyncGenerator that yields 'events' (text chunks, tool calls, etc.)
 * Ref: https://developer.mozilla.org/en-US/docs/Web/JavaScript/Reference/Global_Objects/AsyncGenerator
 */
 const events = runner.runEphemeral({
 userId: 'local-student',
 newMessage: { role: 'user', parts: [{ text: input }] },
 });

 process.stdout.write('\n: ');
 // Iterate through the stream of events
 for await (const event of events) {
 if (event.author !== 'user') {
 // stringifyContent extracts the text from the event object
 const text = stringifyContent(event);
 if (text) process.stdout.write(text);
 }
 }
 process.stdout.write('\n\n');
 } catch (error) {
 console.error('Error:', error.message);
 }
 ask();
 });
 };
 ask();
}

if (require.main === module) main().catch(console.error);
module.exports = { agent };
Test this step by running: node base/agents/run-agent.js
Step 2: Integrating the Knowledge Base (MCP)
Goal: Give your agent access to official Google Cloud documentation. File to modify: base/agents/run-agent.js
Update your LlmAgent configuration to include the MCPToolset. This allows the agent to call the search_documents tool dynamically.
1
2
3
4
5
6
7
8
9
10
11
12
13
14
15
16
17
18
19
20
21
22
23
24
25
26
27
28
29
30
31
32
33
34
/**
 * 1. Update your require statement to include MCPToolset
 * MCP (Model Context Protocol) is an open standard for connecting AI agents to tools.
 * Ref: https://modelcontextprotocol.io/
 */
const { LlmAgent, Runner, MCPToolset, InMemorySessionService, stringifyContent } = require('@google/adk');

/**
 * 2. Update your agent definition to include the tools array:
 * The MCPToolset class handles the connection to an MCP server.
 * Ref: https://github.com/google/adk-docs/blob/main/docs/concepts/tools.md
 */
const agent = new LlmAgent({
 name: 'Thucydides',
 description: 'Known as the father of scientific history. How can I help you?',
 model: 'gemini-3.1-flash-lite-preview',
 provider: 'vertexai',
 instruction: 'Respond in a clear way. For every question about a service, always include information about its free tier and provide links to relevant GitHub samples.',
 // Increase model request timeout (5 minutes)
 timeout: 300000,
 tools: [
 /**
 * MCPToolset connects to a remote or local MCP server.
 * In this workshop, we connect to the Google Developer Knowledge MCP server.
 */
 new MCPToolset({
 type: 'StreamableHTTPConnectionParams',
 url: 'https://developerknowledge.googleapis.com/mcp',
 // Increase tool call timeout (5 minutes)
 timeout: 300000
 })

 ]
});
Step 3: Building the React Web Interface & API
Goal: Move away from the CLI and build a professional chat UI.
3A. The Express Backend
File to modify: base/backend/index.js This file exposes your ADK agent over an HTTP API.
1
2
3
4
5
6
7
8
9
10
11
12
13
14
15
16
17
18
19
20
21
22
23
24
25
26
27
28
29
30
31
32
33
34
35
36
37
38
39
40
41
42
43
44
45
46
47
48
49
50
51
52
53
54
55
56
57
58
59
60
61
62
63
64
65
66
67
68
69
70
71
72
73
74
75
76
77
78
/**
 * Express.js is a fast, unopinionated, minimalist web framework for Node.js.
 * Documentation: https://expressjs.com/
 */
const express = require('express');
const path = require('path');
const cors = require('cors');
const dotenv = require('dotenv');
const { Runner, InMemorySessionService, stringifyContent } = require('@google/adk');
const { agent } = require('../agents/run-agent'); // Import the agent we built in Step 1/2

dotenv.config();
const app = express();
const port = process.env.PORT || 3001;

// CORS allows your React app (running on port 3000) to talk to this server (port 3001)
// Documentation: https://www.npmjs.com/package/cors
app.use(cors());
// Built-in middleware to parse JSON request bodies
app.use(express.json());

// Initialize the ADK Runner
const runner = new Runner({
 appName: 'GCPWorkshop',
 agent,
 sessionService: new InMemorySessionService(),
});

/**
 * Chat Endpoint
 * This route receives a prompt and returns the agent's response.
 */
app.post('/api/chat', async (req, res) => {
 try {
 const { prompt } = req.body;
 if (!prompt) return res.status(400).send({ error: 'Prompt is required' });

 /**
 * Use runEphemeral to process the message.
 * Ephemeral mode is perfect for stateless APIs or when handling history manually.
 */
 const events = runner.runEphemeral({
 userId: 'web-student-mcp',
 newMessage: { role: 'user', parts: [{ text: prompt }] },
 });

 let fullText = "";
 let toolUsed = false;

 /**
 * Process the AsyncGenerator stream.
 * We collect all chunks into a single response string for the web client.
 */
 for await (const event of events) {
 if (event.author !== 'user') {
 const text = stringifyContent(event);
 if (text) fullText += text;

 // Check if a tool (like search_documents) was called
 if (event.toolCalls && event.toolCalls.length > 0) toolUsed = true;
 }
 }

 if (!fullText) fullText = "I processed your request but couldn't generate a text response.";

 // Send the final JSON response
 res.send({ response: fullText, contextUsed: toolUsed });
 } catch (error) {
 console.error(error);
 res.status(500).send({ error: 'Failed to process chat: ' + error.message });
 }
});

const server = app.listen(port, () => console.log(`Server running at http://localhost:${port}`));

// Increase timeout for long-running LLM requests (5 minutes)
server.timeout = 300000;
server.keepAliveTimeout = 300000;
3B. The React Frontend
File to create: base/frontend/src/App.js Create the React component that sends requests to the backend and renders Markdown.
1
2
3
4
5
6
7
8
9
10
11
12
13
14
15
16
17
18
19
20
21
22
23
24
25
26
27
28
29
30
31
32
33
34
35
36
37
38
39
40
41
42
43
44
45
46
47
48
49
50
51
52
53
54
55
56
57
58
59
60
61
62
63
64
65
66
67
68
69
70
71
72
73
74
75
76
77
78
79
80
81
82
83
84
85
86
87
88
89
90
91
/**
 * React is a library for web and native user interfaces.
 * Documentation: https://react.dev/
 */
import React, { useState } from 'react';
/**
 * react-markdown safely renders markdown as React components.
 * Documentation: https://github.com/remarkjs/react-markdown
 */
import ReactMarkdown from 'react-markdown';
import remarkGfm from 'remark-gfm';
import './App.css';

const App = () => {
 // Use React state to track chat messages, current input, and loading status
 // Documentation: https://react.dev/reference/react/useState
 const [messages, setMessages] = useState([]);
 const [input, setInput] = useState('');
 const [isLoading, setIsLoading] = useState(false);

 /**
 * The sendMessage function handles the communication with your Express API.
 */
 const sendMessage = async () => {
 if (!input.trim()) return;

 // Create a user message and update UI state
 const userMsg = { role: 'user', content: input };
 setMessages(prev => [...prev, userMsg]);
 setInput('');
 setIsLoading(true);

 try {
 /**
 * Fetch API is used to make network requests.
 * Documentation: https://developer.mozilla.org/en-US/docs/Web/API/Fetch_API
 */
 const response = await fetch('/api/chat', {
 method: 'POST',
 headers: { 'Content-Type': 'application/json' },
 body: JSON.stringify({ prompt: input }),
 });
 const data = await response.json();

 // Add the AI response message to the state
 setMessages(prev => [...prev, { role: 'ai', content: data.response }]);
 } catch (error) {
 // Basic error handling
 setMessages(prev => [...prev, { role: 'error', content: 'Chat failed.' }]);
 } finally {
 // Always stop the loading indicator
 setIsLoading(false);
 }
 };

 return (
 <div className="chat-container">
 <header>
 <h1>GCP Workshop</h1>
 <button className="clear-btn" onClick={() => setMessages([])}>Clear</button>
 </header>
 {/** Render the list of messages **/}
 <div className="messages">
 {messages.map((m, i) => (
 <div key={i} className={`msg ${m.role}`}>
 {m.role === 'ai' ? (
 /**
 * remark-gfm plugin enables GitHub Flavored Markdown (tables, task lists, etc.)
 * Ref: https://github.com/remarkjs/remark-gfm
 */
 <ReactMarkdown remarkPlugins={[remarkGfm]}>{m.content}</ReactMarkdown>
 ) : ( m.content )}
 </div>
 ))}
 {isLoading && <div className="msg ai">...</div>}
 </div>
 {/** Message input area **/}
 <div className="input-area">
 <input
 value={input}
 onChange={e => setInput(e.target.value)}
 onKeyPress={e => e.key === 'Enter' && sendMessage()}
 placeholder="Ask about GCP..."
 />
 <button onClick={sendMessage} disabled={isLoading}>Send</button>
 </div>
 </div>
 );
};

export default App;
File to modify: base/frontend/src/index.js Update the entry point to render your new App component.
1
2
3
4
5
6
7
import React from 'react';
import { createRoot } from 'react-dom/client';
import App from './App';

const container = document.getElementById('root');
const root = createRoot(container);
root.render(<App />);
File to create: base/frontend/src/App.css Add some basic styling so the Markdown and chat bubbles look clean.
1
2
3
4
5
6
7
8
9
10
11
12
13
14
15
16
17
18
19
.chat-container { display: flex; flex-direction: column; height: 100vh; max-width: 800px; margin: 0 auto; background: #fafafa; border: 1px solid #ddd; font-family: sans-serif; }
header { padding: 10px 20px; background: #4285f4; color: white; display: flex; justify-content: space-between; align-items: center; }
header h1 { margin: 0; font-size: 1.2rem; }
.clear-btn { background: rgba(255,255,255,0.2); color: white; border: 1px solid white; padding: 5px 10px; border-radius: 4px; cursor: pointer; font-size: 0.7rem; }
.clear-btn:hover { background: rgba(255,255,255,0.4); }
.messages { flex: 1; overflow-y: auto; padding: 20px; display: flex; flex-direction: column; }
.msg { margin-bottom: 15px; padding: 12px 16px; border-radius: 12px; max-width: 85%; line-height: 1.5; }
.msg.user { align-self: flex-end; background: #4285f4; color: white; margin-left: auto; border-bottom-right-radius: 2px; }
.msg.ai { background: #eee; color: #333; border-bottom-left-radius: 2px; align-self: flex-start; }
.msg.ai p { margin: 0 0 10px 0; }
.msg.ai p:last-child { margin-bottom: 0; }
.msg.ai h1, .msg.ai h2, .msg.ai h3 { margin: 10px 0; font-size: 1.1rem; }
.msg.ai ul, .msg.ai ol { padding-left: 20px; margin: 10px 0; }
.msg.ai code { background: rgba(0,0,0,0.05); padding: 2px 4px; border-radius: 4px; font-family: monospace; }
.msg.ai pre { background: #282c34; color: #abb2bf; padding: 10px; border-radius: 6px; overflow-x: auto; margin: 10px 0; }
.input-area { display: flex; padding: 20px; border-top: 1px solid #ddd; background: white; }
input { flex: 1; padding: 12px 16px; border-radius: 25px; border: 1px solid #ddd; outline: none; font-size: 1rem; }
button:not(.clear-btn) { margin-left: 10px; padding: 0 25px; border-radius: 25px; border: none; background: #4285f4; color: white; cursor: pointer; font-weight: bold; }
button:disabled { background: #ccc; cursor: not-allowed; }
Step 4: Persistent Chat History (IndexedDB)
Goal: Save the conversation locally in the browser and handle API rate limits.
4A. Setup Storage Logic
File to create: base/frontend/src/storage.js
1
2
3
4
5
6
7
8
9
10
11
12
13
14
15
16
17
18
19
20
21
22
23
24
25
26
27
28
29
30
31
32
33
34
35
36
37
38
39
40
41
42
43
44
45
46
47
48
49
50
51
/**
 * IndexedDB is a low-level API for client-side storage of large amounts of structured data.
 * The 'idb' library is a tiny (1.1k) wrapper that makes it promise-based.
 * Documentation: https://www.npmjs.com/package/idb
 * Ref: https://developer.mozilla.org/en-US/docs/Web/API/IndexedDB_API
 */
import { openDB } from 'idb';

const DB_NAME = 'gcp_workshop_db';
const STORE_NAME = 'messages';

/**
 * Initialize the Database
 * Creates the database and an object store for messages if it doesn't exist.
 */
export const initDB = async () => {
 return openDB(DB_NAME, 1, {
 upgrade(db) {
 if (!db.objectStoreNames.contains(STORE_NAME)) {
 // We use an auto-incrementing key 'id' for each message
 db.createObjectStore(STORE_NAME, { keyPath: 'id', autoIncrement: true });
 }
 },
 });
};

/**
 * Save a message to the browser storage
 * @param {Object} message - { role: 'user' | 'ai', content: string }
 */
export const saveMessage = async (message) => {
 const db = await initDB();
 // Adds the message and a timestamp for sorting
 return db.add(STORE_NAME, { ...message, timestamp: Date.now() });
};

/**
 * Retrieve all messages from storage
 */
export const getAllMessages = async () => {
 const db = await initDB();
 return db.getAll(STORE_NAME);
};

/**
 * Clear the chat history
 */
export const clearHistory = async () => {
 const db = await initDB();
 return db.clear(STORE_NAME);
};
4B. Update Backend to Handle Rate Limits
File to modify: base/backend/index.js Update your error handling to detect 429 (Too Many Requests) errors from the AI model.
1
2
3
4
5
6
7
8
9
10
11
12
app.post('/api/chat', async (req, res) => {
  try {
    // ... (previous logic)
  } catch (error) {
    console.error('CRITICAL ERROR with ADK:', error);
    // Detect rate limit errors from the Gemini model
    if (error.message.includes('429') || error.message.toLowerCase().includes('too many requests')) {
      return res.status(429).send({ error: 'The AI model is receiving too many requests. Please wait a moment and try again.' });
    }
    res.status(500).send({ error: 'Failed to process chat: ' + error.message });
  }
});
4C. Update React to Use Storage & Handle Errors
File to modify: base/frontend/src/App.js
Now, update the App.js component to load existing messages on startup, save new ones, and display warnings for rate limits.
1
2
3
4
5
6
7
8
9
10
11
12
13
14
15
16
17
18
19
20
21
22
23
24
25
26
27
28
29
30
31
32
33
34
35
36
37
38
39
40
41
42
43
44
45
46
47
48
49
50
51
52
53
54
55
56
57
58
59
60
61
62
63
64
65
66
67
68
69
70
71
72
73
74
75
76
77
78
79
80
81
82
import React, { useState, useEffect } from 'react';
import ReactMarkdown from 'react-markdown';
import remarkGfm from 'remark-gfm';
import { saveMessage, getAllMessages, clearHistory } from './storage';
import './App.css';

const App = () => {
 const [messages, setMessages] = useState([]);
 const [input, setInput] = useState('');
 const [isLoading, setIsLoading] = useState(false);

 // Load messages from IndexedDB on startup
 useEffect(() => {
 getAllMessages().then(setMessages);
 }, []);

 const sendMessage = async () => {
 if (!input.trim()) return;

 const userMsg = { role: 'user', content: input };
 setMessages(prev => [...prev, userMsg]);
 await saveMessage(userMsg); // Save user message

 setInput('');
 setIsLoading(true);

 try {
 const response = await fetch('/api/chat', {
 method: 'POST',
 headers: { 'Content-Type': 'application/json' },
 body: JSON.stringify({ prompt: input }),
 });
 const data = await response.json();

 // Handle Rate Limiting (429)
 if (response.status === 429) {
 setMessages(prev => [...prev, { role: 'ai', content: "⚠️ **Too many requests.** The AI model is currently busy. Please wait a few seconds and try again." }]);
 return;
 }

 if (!response.ok) throw new Error(data.error || 'Chat failed');

 const aiMsg = { role: 'ai', content: data.response };
 setMessages(prev => [...prev, aiMsg]);
 await saveMessage(aiMsg); // Save AI response
 } catch (error) {
 setMessages(prev => [...prev, { role: 'error', content: 'Chat failed. ' + error.message }]);
 } finally {
 setIsLoading(false);
 }
 };

 const handleClear = async () => {
 await clearHistory();
 setMessages([]);
 };

 return (
 <div className="chat-container">
 <header>
 <h1>GCP Workshop</h1>
 <button className="clear-btn" onClick={handleClear}>Clear History</button>
 </header>
 <div className="messages">
 {messages.map((m, i) => (
 <div key={i} className={`msg ${m.role}`}>
 {m.role === 'ai' ? (
 <ReactMarkdown remarkPlugins={[remarkGfm]}>{m.content}</ReactMarkdown>
 ) : ( m.content )}
 </div>
 ))}
 {isLoading && <div className="msg ai">...</div>}
 </div>
 <div className="input-area">
 <input value={input} onChange={e => setInput(e.target.value)} onKeyPress={e => e.key === 'Enter' && sendMessage()} />
 <button onClick={sendMessage} disabled={isLoading}>Send</button>
 </div>
 </div>
 );
};

export default App;
Step 5: Containerization & Deployment
Goal: Package your full-stack application and deploy it to Google Cloud Run.
5A. Production Static Serving
File to modify: base/backend/index.js Add this logic right before app.listen so Express serves the built React app.
1
2
3
4
5
6
7
// Serve static build if in production
if (process.env.NODE_ENV === 'production') {
 app.use(express.static(path.join(__dirname, '../dist')));
 app.get('*', (req, res) => {
 res.sendFile(path.join(__dirname, '../dist/index.html'));
 });
}
5B. The Dockerfile
File to create: base/Dockerfile
1
2
3
4
5
6
7
8
9
10
11
12
13
14
15
16
17
18
19
20
# Build Stage for React
FROM node:20-slim AS build
WORKDIR /app
COPY package*.json ./
RUN npm install
COPY . .
RUN npm run build

# Production Stage for Node.js
FROM node:20-slim
WORKDIR /app
COPY --from=build /app/package*.json ./
RUN npm install --production
COPY --from=build /app/dist ./dist
COPY --from=build /app/backend ./backend
COPY --from=build /app/agents ./agents

ENV NODE_ENV=production
EXPOSE 8080
CMD ["npm", "run", "server"]
Step 6: Automated Testing
Goal: Verify your backend API logic using Jest. File to create: base/tests/server.test.js
Why Mocking?
In production, ADK connects to real LLMs (like Gemini) via Vertex AI, which takes time and costs money. For automated tests, we use mocks to simulate the ADK behavior. Since the ADK’s runEphemeral method returns an async generator (to support streaming), our mock must also be an async generator.
1
2
3
4
5
6
7
8
9
10
11
12
13
14
15
16
17
18
19
20
21
22
23
24
25
26
27
28
29
30
31
32
33
34
35
36
37
38
39
40
41
42
43
44
45
46
47
48
49
50
51
52
53
54
55
56
57
58
59
60
61
62
63
64
65
66
67
68
69
70
71
72
/**
 * Supertest allows you to test Node.js HTTP servers.
 * Documentation: https://www.npmjs.com/package/supertest
 */
const request = require('supertest');
/**
 * Jest is a delightful JavaScript Testing Framework with a focus on simplicity.
 * Documentation: https://jestjs.io/
 */
const express = require('express');

/**
 * 1. Mock the ADK library
 * Documentation for jest.mock: https://jestjs.io/docs/mock-functions
 *
 * We simulate 'runEphemeral' returning a single "chunk" of text.
 * Since the real method is an AsyncGenerator, we use 'async function*'.
 */
const mockRunEphemeral = function() {
 return (async function* () {
 yield { author: 'ai', toolCalls: [], content: { parts: [{ text: "This is a mocked answer from ADK" }] } };
 })();
};

jest.mock('@google/adk', () => ({
 Runner: jest.fn().mockImplementation(() => ({
 runEphemeral: mockRunEphemeral
 })),
 InMemorySessionService: jest.fn(),
 stringifyContent: (event) => event.content.parts[0].text
}));

/**
 * 2. Setup a test app
 * We create a minimal version of our Express server for testing.
 */
const app = express();
app.use(express.json());

app.post('/api/chat', async (req, res) => {
 const { prompt } = req.body;
 if (!prompt) return res.status(400).send({ error: 'Prompt is required' });

 const { Runner, stringifyContent } = require('@google/adk');
 const runner = new Runner({});
 const events = runner.runEphemeral({});

 let text = "";
 for await (const event of events) {
 const content = stringifyContent(event);
 if (content) text += content;
 }

 res.send({ response: text });
});

/**
 * 3. Define the test suite
 */
describe('Chat API (ADK Test)', () => {
 /**
 * Test case: Verify that our endpoint correctly interacts with the (mocked) ADK.
 */
 test('POST /api/chat returns a response from ADK mock', async () => {
 const response = await request(app).post('/api/chat').send({ prompt: 'Test' });

 // Expectation: Status should be 200 (OK)
 expect(response.status).toBe(200);
 // Expectation: The response body should match our mock's output
 expect(response.body.response).toBe('This is a mocked answer from ADK');
 });
});
Run your tests with: npm run test
References:
- Visit my blog at nja.dev
- Explore more visual diagrams at drawit.nja.dev
Congratulations! You have built a robust, cloud-native chatbot using the latest Gemini models and the Google Agent Development Kit.